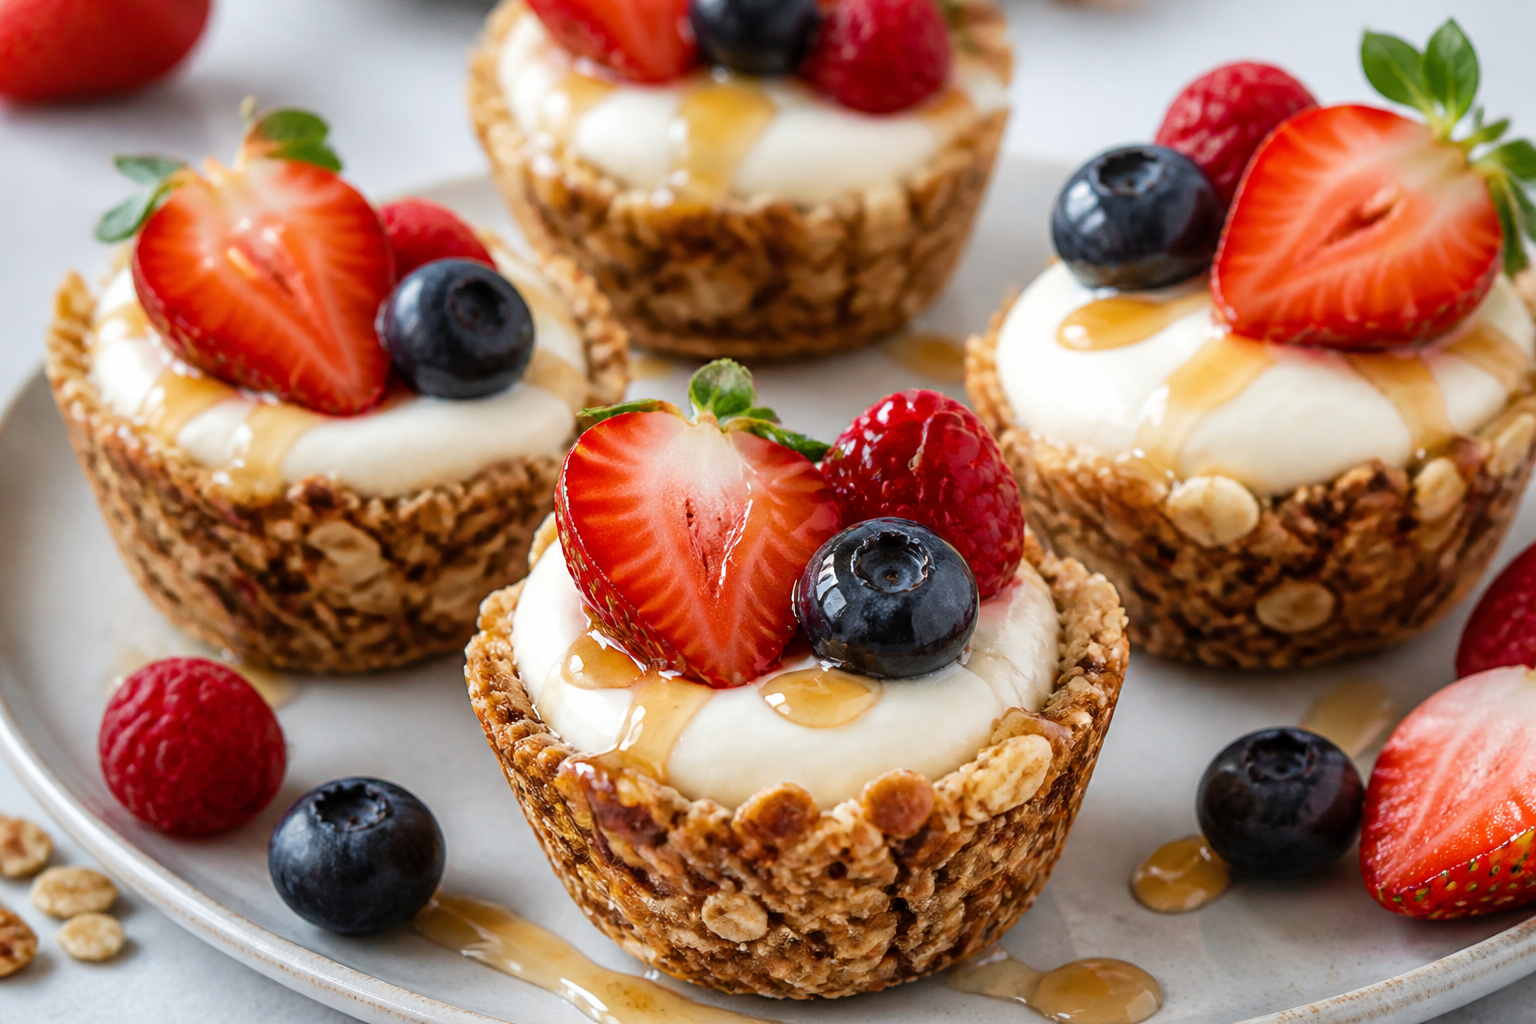
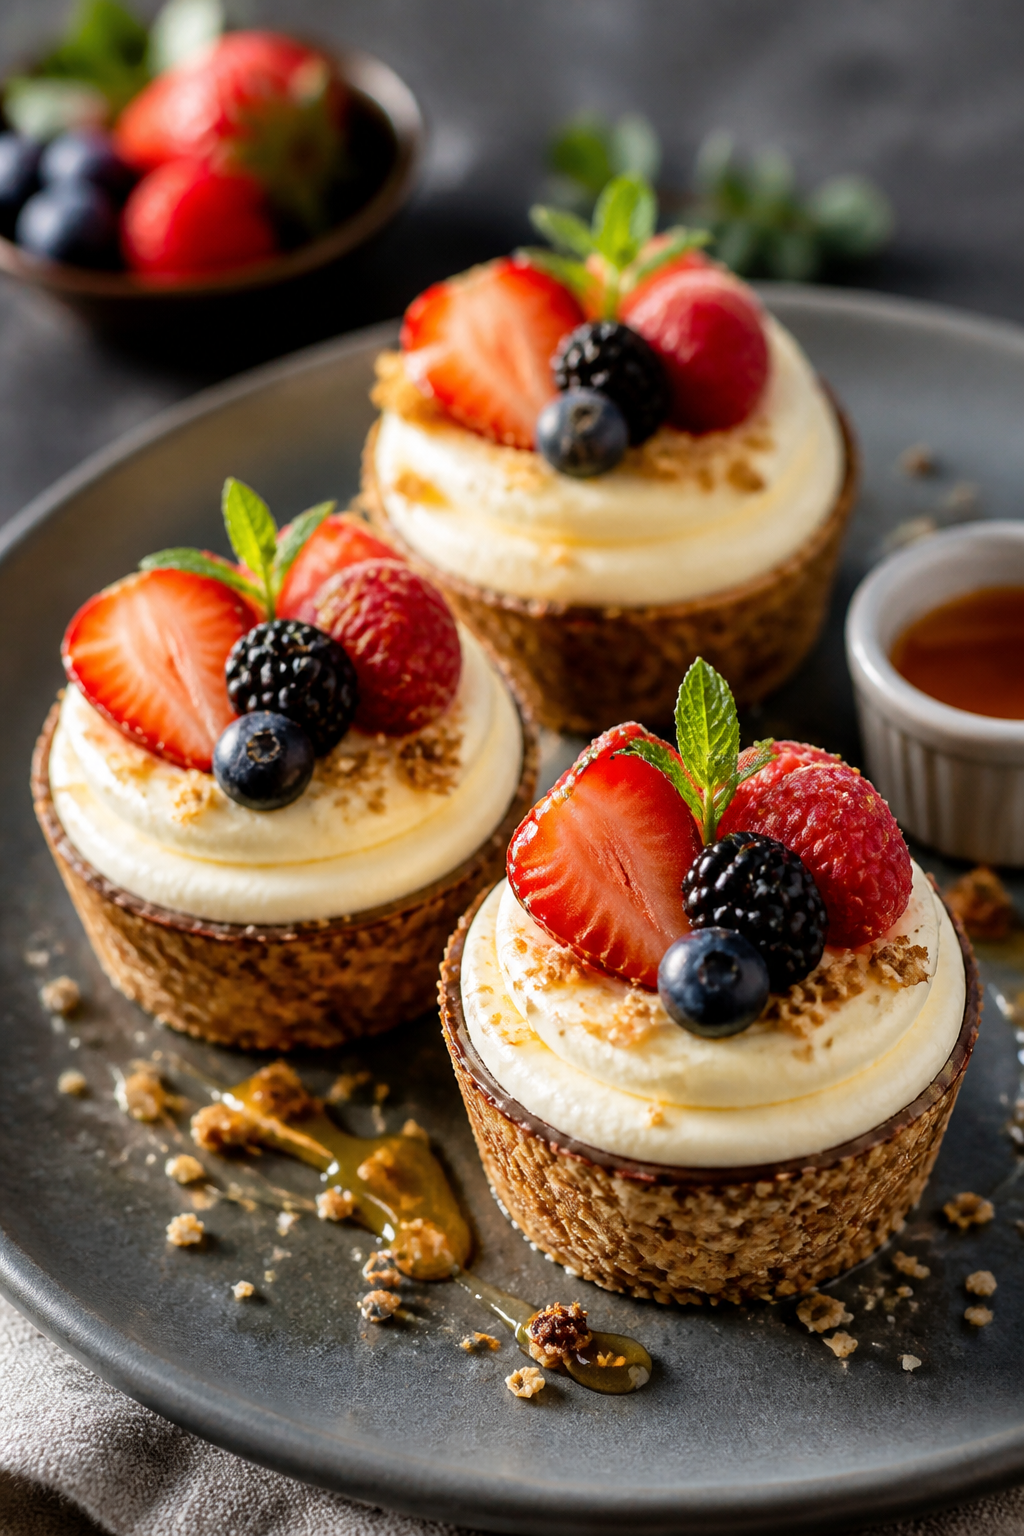
High Protein Cheesecake Granola Cups – A Simple, Satisfying Sweet Snack
These High Protein Cheesecake Granola Cups give you the best of both worlds: a crunchy granola base and a creamy cheesecake-style filling that actually keeps you full. They’re easy to assemble, don’t require fancy equipment, and look impressive enough for a brunch spread or after-dinner treat. The filling is smooth and lightly sweet, and the cups hold up well in the fridge for days.
Make a batch on Sunday, and you’ve got a grab-and-go snack that doesn’t feel like a compromise. If you like dessert with a purpose, this recipe is right up your alley.
Ingredients
Method
- Prep your pan. Line a standard 12-cup muffin tin with paper liners or use a silicone muffin pan. This makes removal easy and preserves the crust.
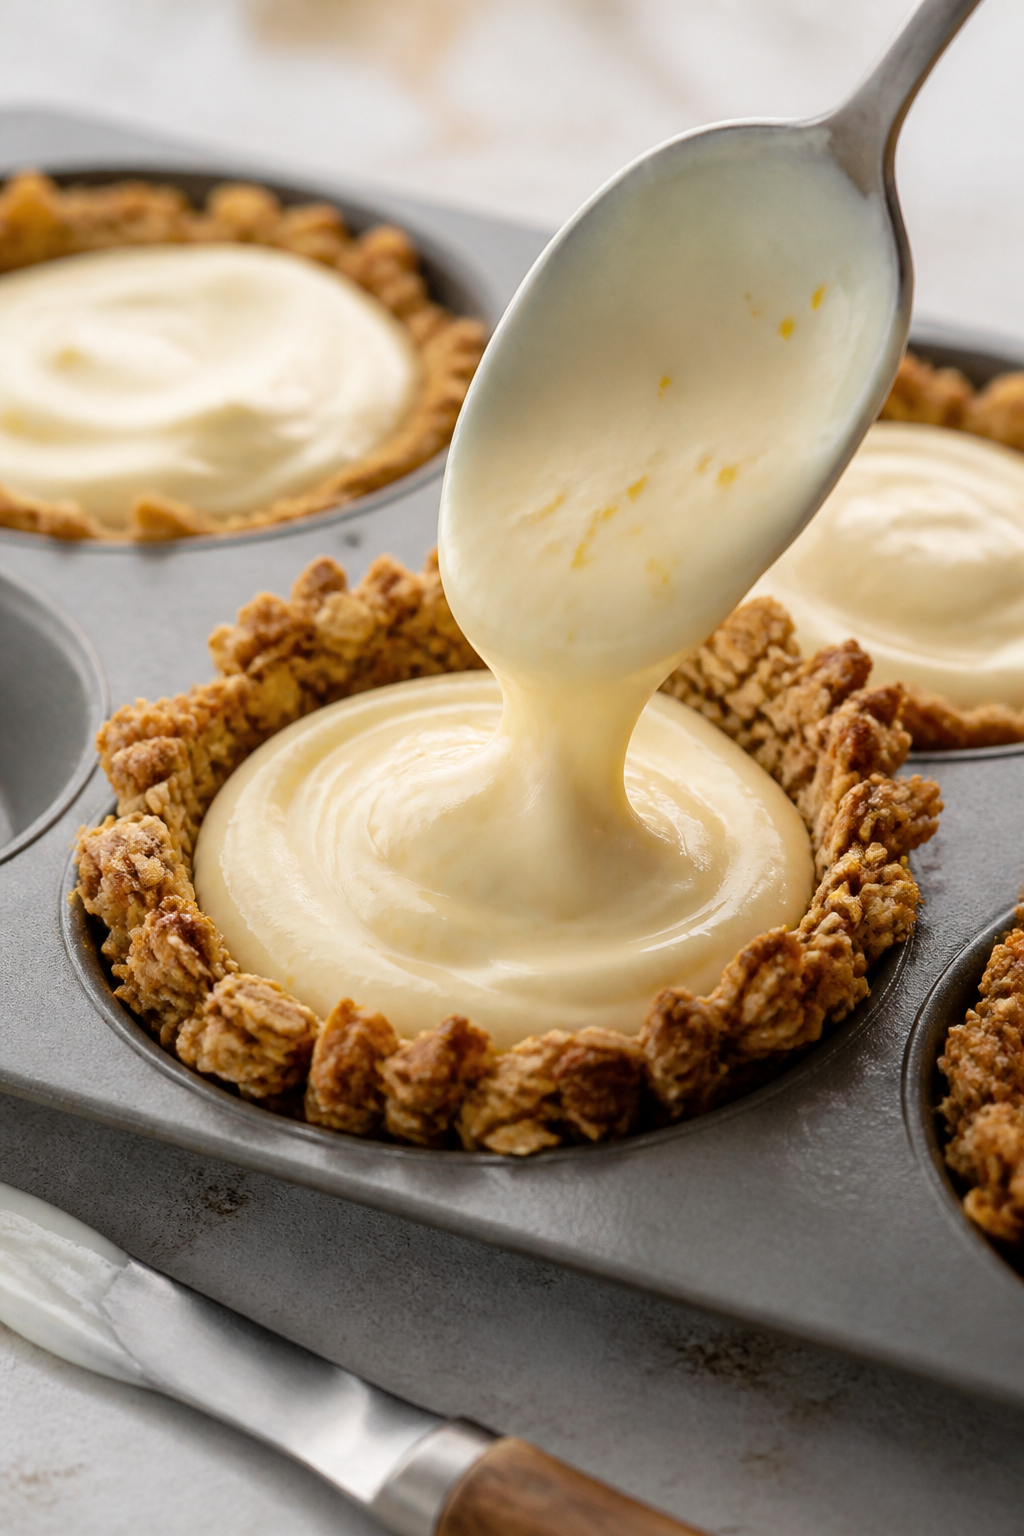
- Make the granola base. In a large bowl, combine 1½ cups rolled oats, 1 cup granola, and ½ cup chopped nuts. Add ¼ cup melted coconut oil, ¼ cup nut butter, 3 tablespoons honey or maple syrup, 1 teaspoon vanilla, ½ teaspoon cinnamon, and a small pinch of salt. Stir until the mixture clumps and everything is evenly coated.
- Press into cups. Divide the mixture among the muffin wells. Use the back of a spoon or a small measuring cup to press it firmly into the bottom and slightly up the sides to form a well. Firm pressure is key so the cups hold together.
- Chill the crust. Place the pan in the freezer for 15–20 minutes, or refrigerate for 30 minutes, until the base is set and firm.
- Mix the filling. In a medium bowl, beat 8 ounces light cream cheese until smooth. Add 1 cup Greek yogurt, 1 scoop (about 25–30 g) vanilla or unflavored protein powder, 1–3 tablespoons sweetener (to taste), 1 teaspoon vanilla, and a teaspoon of lemon zest with 1–2 teaspoons lemon juice if using. Whisk or blend until silky and lump-free.
- Taste and adjust. If the filling is too thick, add a splash of milk. If it’s not sweet enough, add a bit more sweetener. The texture should be like thick pudding.
- Fill the cups. Spoon or pipe the cheesecake filling into each chilled crust, filling nearly to the top. Smooth the surface with the back of a spoon.
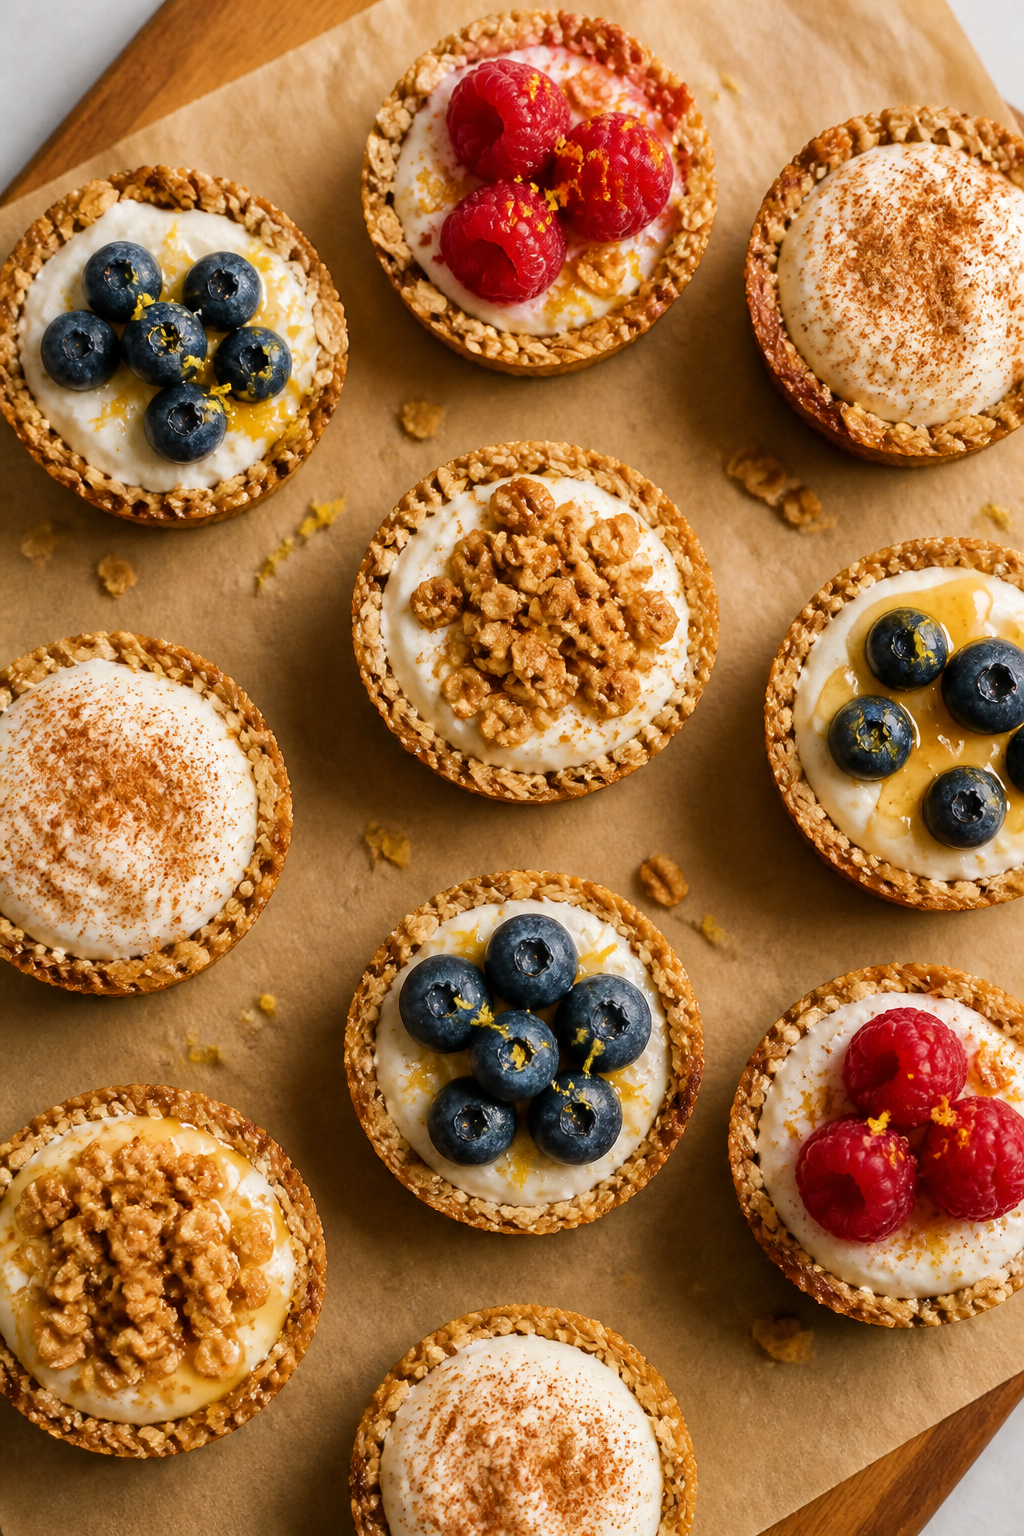
- Top and set. Add fresh berries, a sprinkle of granola, or a light dusting of cinnamon. Refrigerate at least 1 hour to set the filling and help the flavors come together.
- Serve. Gently lift each cup from the pan. If using paper liners, peel them off just before eating for the cleanest edges.
What Makes This Recipe So Good
- Protein-packed and satisfying: Greek yogurt, light cream cheese, and whey or plant protein make these cups filling without feeling heavy.
- No-bake and beginner-friendly: The base sets in the fridge, and the filling whips together in minutes. No oven, no stress.
- Customizable sweetness: Use honey, maple syrup, or a zero-calorie sweetener.
You’re in control of the flavor and macros.
- Crunchy-meets-creamy texture: The contrast is what makes these so addictive. The granola shell stays crisp while the center is silky.
- Perfect for meal prep: They store well and are easy to portion. Great for lunchboxes or post-workout snacks.
Shopping List
- Old-fashioned rolled oats (not quick oats)
- Granola (plain or lightly sweetened; look for minimal clusters)
- Almonds or walnuts (roughly chopped)
- Nut or seed butter (peanut, almond, or sunflower)
- Honey or maple syrup (or a sugar-free syrup)
- Coconut oil (or light olive oil)
- Ground cinnamon and a pinch of salt
- Vanilla extract
- Light cream cheese (room temperature)
- Plain Greek yogurt (2% or 0%)
- Whey or plant-based protein powder (vanilla or unflavored)
- Lemon zest and fresh lemon juice (optional but brightens the filling)
- Sweetener for the filling (honey, maple, or powdered sugar/sugar-free sweetener)
- Fresh berries or other fruit for topping
Step-by-Step Instructions
- Prep your pan. Line a standard 12-cup muffin tin with paper liners or use a silicone muffin pan.
This makes removal easy and preserves the crust.
- Make the granola base. In a large bowl, combine 1½ cups rolled oats, 1 cup granola, and ½ cup chopped nuts. Add ¼ cup melted coconut oil, ¼ cup nut butter, 3 tablespoons honey or maple syrup, 1 teaspoon vanilla, ½ teaspoon cinnamon, and a small pinch of salt. Stir until the mixture clumps and everything is evenly coated.
- Press into cups. Divide the mixture among the muffin wells.
Use the back of a spoon or a small measuring cup to press it firmly into the bottom and slightly up the sides to form a well. Firm pressure is key so the cups hold together.
- Chill the crust. Place the pan in the freezer for 15–20 minutes, or refrigerate for 30 minutes, until the base is set and firm.
- Mix the filling. In a medium bowl, beat 8 ounces light cream cheese until smooth. Add 1 cup Greek yogurt, 1 scoop (about 25–30 g) vanilla or unflavored protein powder, 1–3 tablespoons sweetener (to taste), 1 teaspoon vanilla, and a teaspoon of lemon zest with 1–2 teaspoons lemon juice if using. Whisk or blend until silky and lump-free.
- Taste and adjust. If the filling is too thick, add a splash of milk.
If it’s not sweet enough, add a bit more sweetener. The texture should be like thick pudding.
- Fill the cups. Spoon or pipe the cheesecake filling into each chilled crust, filling nearly to the top. Smooth the surface with the back of a spoon.
- Top and set. Add fresh berries, a sprinkle of granola, or a light dusting of cinnamon.
Refrigerate at least 1 hour to set the filling and help the flavors come together.
- Serve. Gently lift each cup from the pan. If using paper liners, peel them off just before eating for the cleanest edges.
Keeping It Fresh
- Refrigerate: Store in an airtight container for up to 4 days. Keep toppings like fresh fruit separate until serving if you want maximum freshness.
- Freeze for later: Freeze on a sheet pan until solid, then transfer to a freezer bag.
Thaw in the fridge overnight. Note: fresh berries may weep after thawing, so add them later.
- Prevent sogginess: Add a thin brush of melted chocolate to the crust before filling for a moisture barrier, or serve fruit on top right before eating.
Why This is Good for You
- High-quality protein: Greek yogurt, cream cheese, and protein powder deliver a steady release of amino acids for satiety and muscle repair.
- Fiber and healthy fats: Oats, nuts, and nut butter provide fiber and fats that help stabilize energy and support fullness.
- Balanced treat: You get dessert vibes with better macros than a standard cheesecake, especially if you choose a lighter sweetener and lean dairy.
- Micronutrient boost: Lemon zest, nuts, and berries add antioxidants and vitamins with minimal extra effort.
Common Mistakes to Avoid
- Using quick oats: They get mushy. Rolled oats keep the crust crisp and structured.
- Under-pressing the crust: If you don’t compact it well, the cups can crumble.
Press firmly and chill before filling.
- Over-sweetening: Protein powder often has sweetener. Taste the filling before adding more.
- Skipping room temperature cream cheese: Cold cream cheese creates lumps. Let it soften for a smooth filling.
- Adding wet fruit too early: Watery berries can soften the crust.
Add fruit just before serving or pat them dry first.
Alternatives
- Dairy-free: Use dairy-free cream cheese and coconut or almond yogurt. Opt for a plant-based protein powder.
- Gluten-free: Use certified gluten-free oats and granola.
- Lower sugar: Swap honey/maple with a monk fruit or allulose syrup in the crust, and use a powdered zero-calorie sweetener in the filling.
- Flavor twists: Add 1 tablespoon cocoa powder to the filling for chocolate, mix in crushed freeze-dried berries, or swirl in 1–2 teaspoons peanut butter or jam per cup.
- Nut-free: Use sunflower seed butter and skip the chopped nuts; add pumpkin or sunflower seeds for crunch.
FAQ
How much protein is in each cup?
It depends on your protein powder and dairy choices, but most versions land around 8–12 grams of protein per cup. If you want more, add an extra half scoop of powder to the filling or use 2% Greek yogurt instead of fat-free.
Can I bake the crust?
Yes.
Bake the pressed crusts at 325°F (165°C) for 8–10 minutes until lightly golden, then cool completely before filling. Baking gives extra crunch and helps them hold up longer.
What if I don’t have a muffin pan?
Use silicone cupcake molds on a sheet tray, or press the mixture into a parchment-lined 8×8-inch pan. After chilling and topping with the filling, slice into bars.
Which protein powder works best?
Whey blends whip up creamy and smooth, while casein makes a thicker, almost mousse-like filling.
For dairy-free, pea or soy protein works, but you may need an extra splash of milk for a silky texture.
Can I make these ahead for a party?
Absolutely. Assemble the cups up to 24 hours ahead. Add fresh fruit right before serving for the best look and texture.
Why is my crust falling apart?
It usually means not enough binder or not enough pressure when pressing.
Add another tablespoon of melted coconut oil or nut butter, and be sure to press the mixture in firmly, then chill until solid.
How do I prevent a chalky filling?
Blend the filling thoroughly and use a protein powder you like in smoothies. If it’s still chalky, add a tablespoon of milk and a pinch of salt, then mix again to round out the flavor.
Can I reduce the fat?
Yes. Cut the coconut oil to 2 tablespoons and use powdered peanut butter mixed with water instead of nut butter.
Note the crust may be slightly less sturdy.
Wrapping Up
High Protein Cheesecake Granola Cups are the kind of treat you’ll actually look forward to eating. They’re easy to prep, customizable, and perfect when you want something sweet that still fits your goals. Keep a batch in the fridge for busy mornings, post-workout snacks, or a simple dessert that doesn’t derail your day.
Once you lock in your favorite flavor combo, these will be a regular in your rotation. Enjoy every creamy, crunchy bite.
Printable Recipe Card
Want just the essential recipe details without scrolling through the article? Get our printable recipe card with just the ingredients and instructions.