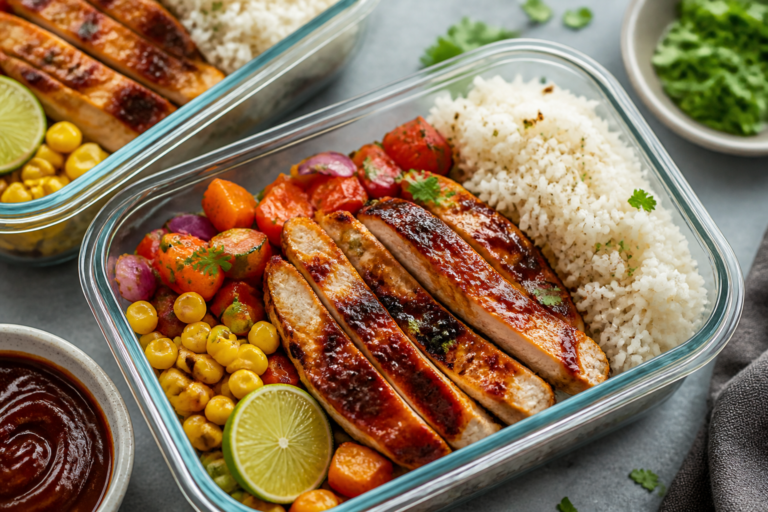
Honey Garlic Chicken Meal Prep – Easy, Flavor-Packed Lunches for the Week
If your weekday lunches feel repetitive or rushed, this Honey Garlic Chicken Meal Prep will save the day. It’s sweet, savory, and slightly sticky—in the best way—while still being simple to make. The sauce uses pantry staples and comes together in minutes.
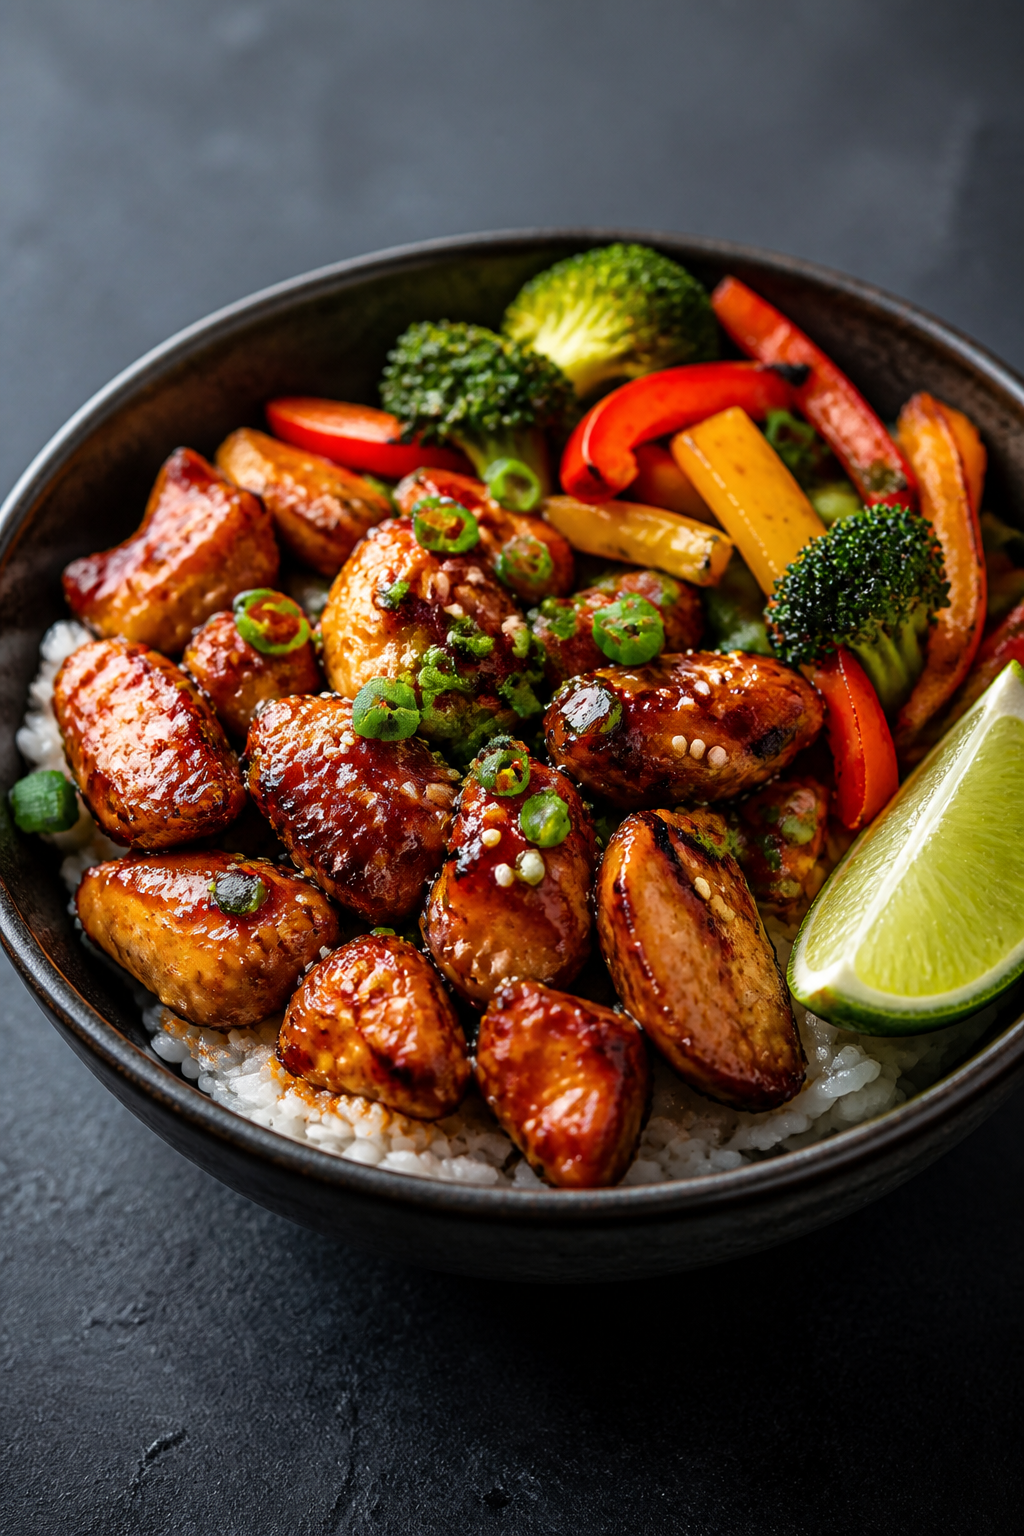
Paired with rice and crisp veggies, it’s a balanced meal that reheats beautifully. Make it once, and you’ll have flavorful, ready-to-go bowls all week.
Ingredients
Method
- Cook your base. Make your rice or grain according to package directions. Fluff and set aside. You can start this first so it’s ready when the chicken is done.
- Prep the sauce. In a small bowl, whisk honey, soy sauce, rice vinegar, sesame oil, red pepper flakes (if using), and the cornstarch slurry. Set aside.
- Season the chicken. Pat the chicken dry and season with salt and pepper. Drying helps it brown better.
- Sear the chicken. Heat oil in a large skillet over medium-high. Add chicken in a single layer and cook 5–7 minutes, stirring occasionally, until browned and cooked through. Work in batches if needed so you don’t overcrowd the pan.
- Add aromatics. Reduce heat to medium. Push chicken to the sides and add garlic (and ginger, if using) to the center with a splash of oil. Cook 30–60 seconds until fragrant.
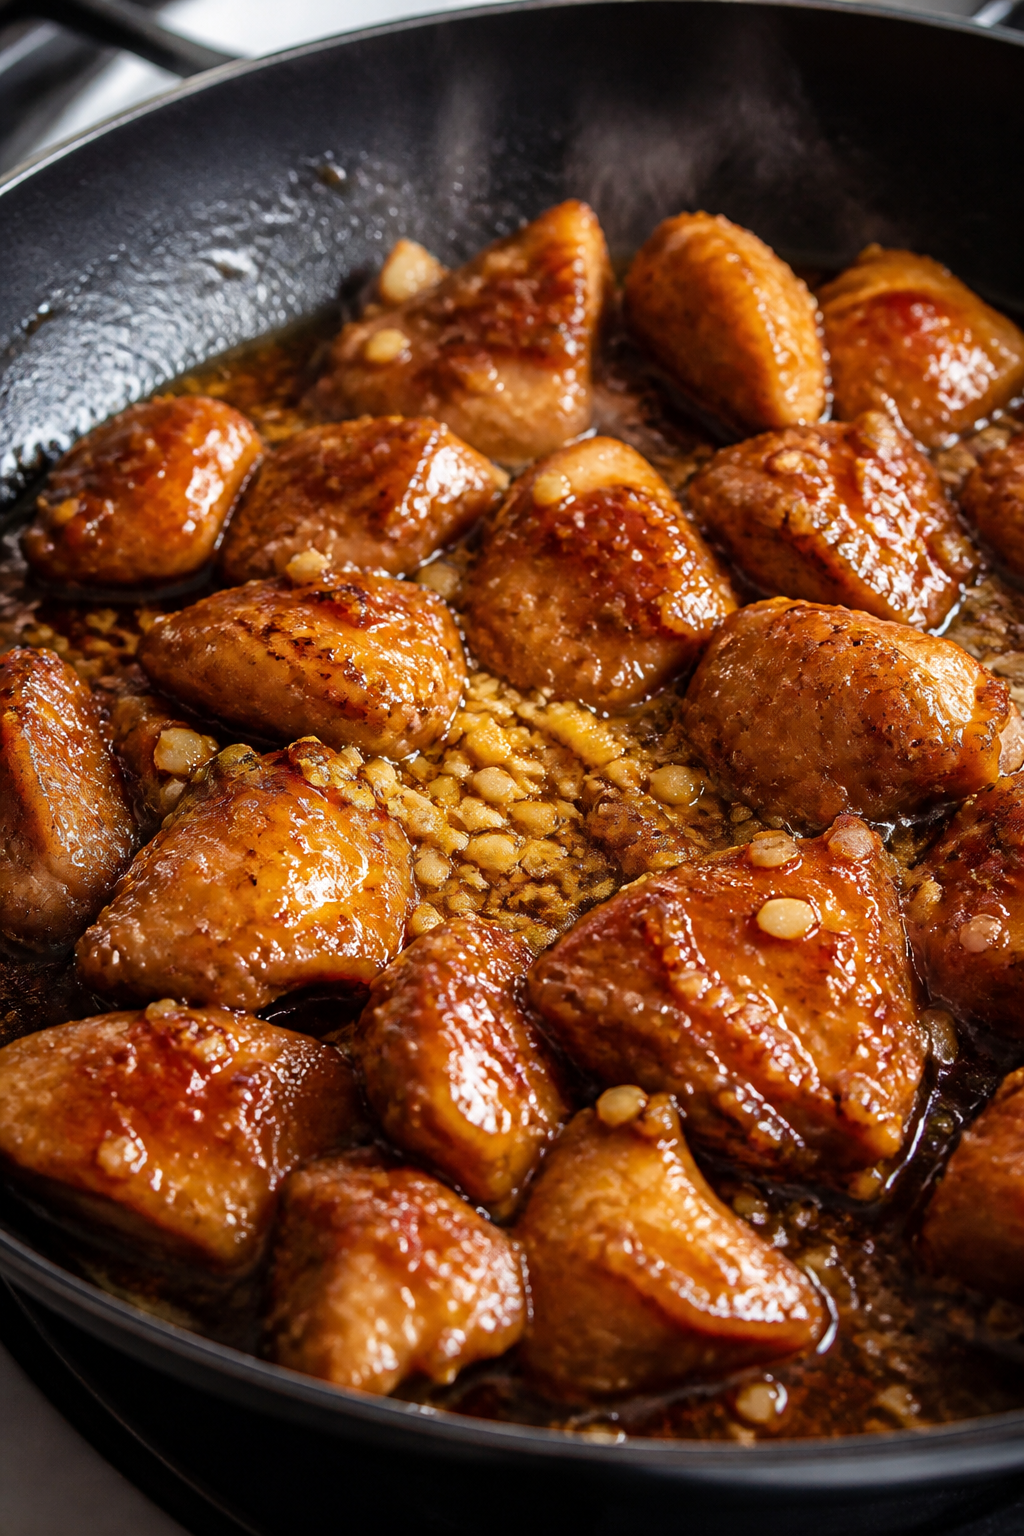
- Sauce it up. Pour the sauce into the pan and toss with the chicken. Simmer 1–3 minutes, stirring, until the sauce thickens and coats the meat. If it gets too thick, add a tablespoon of water at a time to loosen.
- Cook the vegetables. Steam or sauté broccoli, snap peas, or peppers until crisp-tender. Season lightly with salt and pepper.
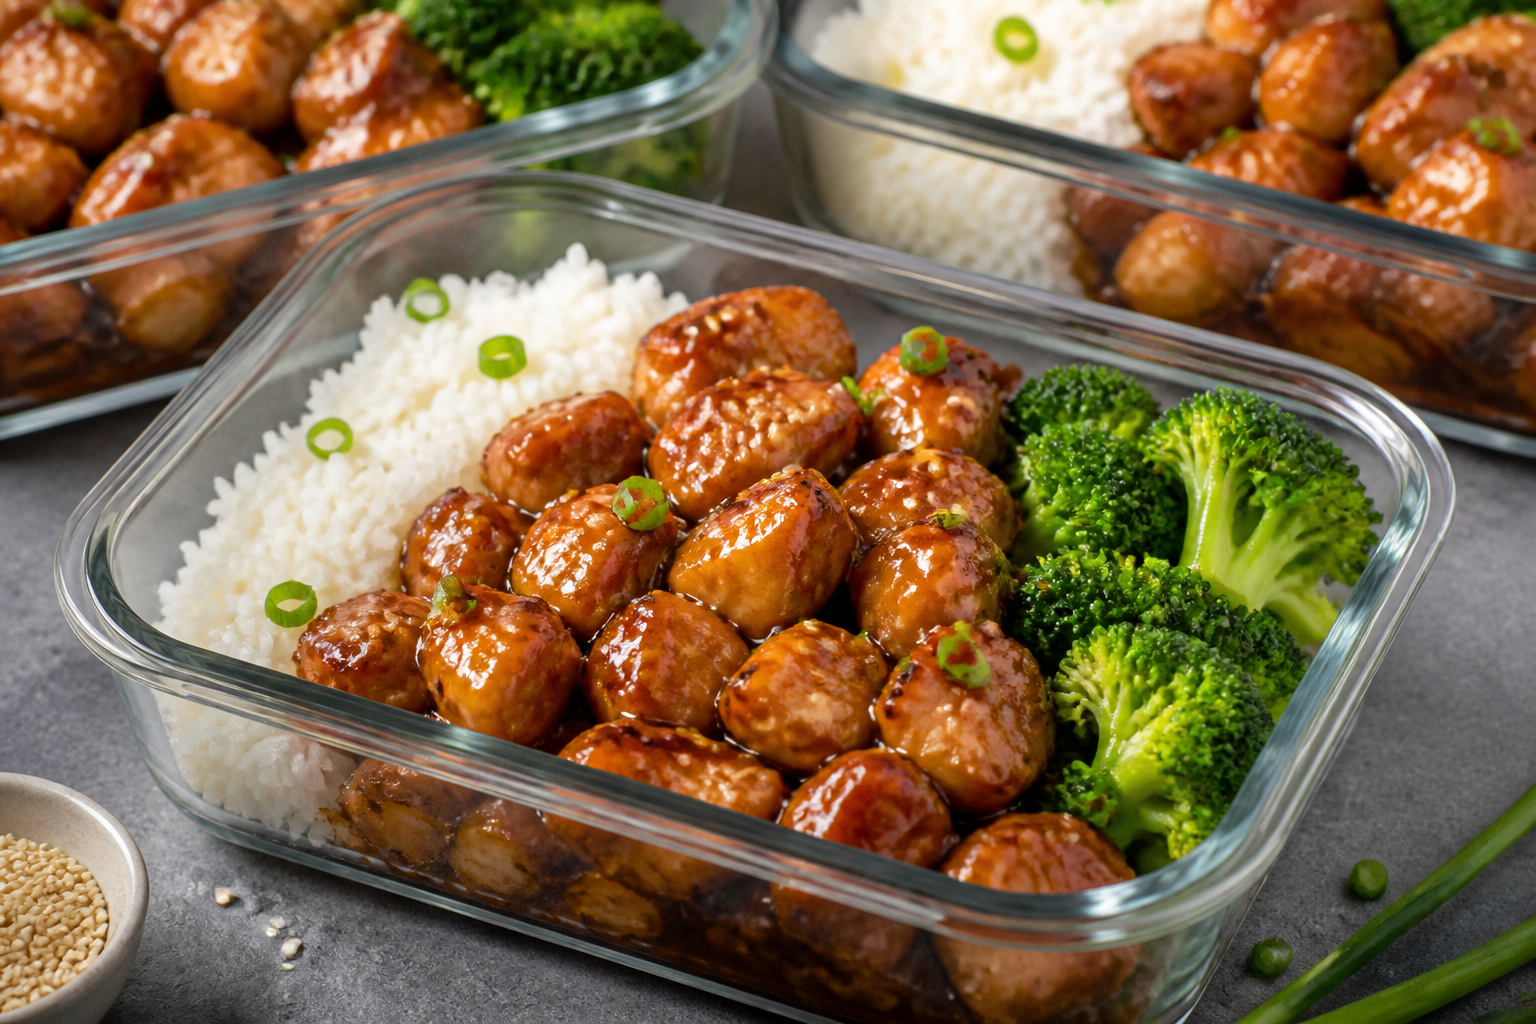
- Assemble bowls. Divide rice among 4–5 containers. Top with honey garlic chicken and veggies. Sprinkle with sesame seeds and green onions. Add lime wedges if you like a fresh, tangy finish.
- Cool, then seal. Let containers cool uncovered for 15–20 minutes, then seal and refrigerate.
What Makes This Special
This recipe hits that perfect balance of sweet, garlicky, and tangy without being heavy. The sauce clings to the chicken, so every bite stays tasty even after a few days in the fridge.
It’s also highly flexible: swap the grain, change the veggies, or adjust the sweetness to your taste. Best of all, it scales easily, so you can prep for two people or a full house with almost no extra effort.
Ingredients
- Chicken: 2 pounds boneless, skinless chicken thighs (or breasts), cut into bite-size pieces
- Salt and pepper: To season the chicken
- Oil: 1–2 tablespoons avocado or olive oil for searing
- Garlic: 5–6 cloves, minced
- Ginger (optional): 1 tablespoon freshly grated
- Honey: 1/3 cup
- Soy sauce: 1/3 cup low-sodium (or tamari for gluten-free)
- Rice vinegar: 1–2 tablespoons (or lemon juice)
- Sesame oil: 1 teaspoon
- Cornstarch: 1 tablespoon mixed with 2 tablespoons water (slurry)
- Red pepper flakes: 1/4 teaspoon (optional, for heat)
- Sesame seeds: 1 tablespoon, for garnish
- Green onions: 2–3, thinly sliced
- Rice or grain: 4 cups cooked jasmine rice, brown rice, or quinoa
- Vegetables: 3 cups broccoli florets, snap peas, or mixed bell peppers
- Lime wedges: Optional, for serving
Instructions

- Cook your base. Make your rice or grain according to package directions. Fluff and set aside.
You can start this first so it’s ready when the chicken is done.
- Prep the sauce. In a small bowl, whisk honey, soy sauce, rice vinegar, sesame oil, red pepper flakes (if using), and the cornstarch slurry. Set aside.
- Season the chicken. Pat the chicken dry and season with salt and pepper. Drying helps it brown better.
- Sear the chicken. Heat oil in a large skillet over medium-high.
Add chicken in a single layer and cook 5–7 minutes, stirring occasionally, until browned and cooked through. Work in batches if needed so you don’t overcrowd the pan.
- Add aromatics. Reduce heat to medium. Push chicken to the sides and add garlic (and ginger, if using) to the center with a splash of oil.
Cook 30–60 seconds until fragrant.
- Sauce it up. Pour the sauce into the pan and toss with the chicken. Simmer 1–3 minutes, stirring, until the sauce thickens and coats the meat. If it gets too thick, add a tablespoon of water at a time to loosen.
- Cook the vegetables. Steam or sauté broccoli, snap peas, or peppers until crisp-tender.
Season lightly with salt and pepper.
- Assemble bowls. Divide rice among 4–5 containers. Top with honey garlic chicken and veggies. Sprinkle with sesame seeds and green onions.
Add lime wedges if you like a fresh, tangy finish.
- Cool, then seal. Let containers cool uncovered for 15–20 minutes, then seal and refrigerate.
How to Store
- Refrigerator: Store in airtight containers for up to 4 days. Keep the lid slightly ajar until the food is no longer steaming to prevent condensation.
- Freezer: Freeze up to 2 months. For best texture, undercook the veggies slightly before freezing.
Thaw overnight in the fridge.
- Reheating: Microwave on medium power 1–2 minutes, stirring halfway. Add a splash of water if rice seems dry. On the stovetop, warm over low heat with a bit of water to loosen the sauce.
Health Benefits
- Protein-rich: Chicken provides high-quality protein for steady energy and muscle repair.
- Balanced carbs: Rice or quinoa offers complex carbohydrates that keep you full longer, especially if you choose brown rice or quinoa for added fiber.
- Micronutrients: Broccoli, peppers, and snap peas contribute vitamin C, vitamin K, folate, and antioxidants.
- Manageable sodium: Using low-sodium soy sauce keeps salt in check without losing flavor.
- Portion control: Pre-portioned containers help you stick to your goals and reduce last-minute snacking.
Common Mistakes to Avoid
- Overcrowding the pan: This steams the chicken and prevents browning.
Cook in batches for the best texture.
- Adding garlic too early: Garlic burns fast and turns bitter. Sauté it briefly after searing the chicken.
- Skipping the cornstarch slurry: The slurry ensures a glossy, clingy sauce. Without it, the sauce may be thin and run off.
- Not cooling before sealing: Trapping steam leads to soggy rice and watery sauce.
Let everything cool slightly first.
- Overcooking veggies: Aim for crisp-tender. They’ll soften more when reheated, so undercook them by a minute.
Recipe Variations
- Spicy Honey Garlic: Add 1 teaspoon sriracha or gochujang to the sauce for a kick.
- Citrus Twist: Swap rice vinegar for fresh lemon or orange juice and finish with extra zest.
- Lower Sugar: Reduce honey to 3 tablespoons and add a splash more vinegar for balance.
- Gluten-Free: Use tamari or coconut aminos instead of soy sauce and check your cornstarch brand.
- Veggie Boost: Add sautéed mushrooms, shredded carrots, or edamame for extra fiber and texture.
- Different Proteins: Try turkey tenderloin, tofu (pressed and pan-seared), or shrimp. For shrimp, cook only 2–3 minutes and add sauce right at the end.
- Alternative Bases: Serve over cauliflower rice, farro, or mixed greens for a lighter option.
FAQ
Can I use chicken breasts instead of thighs?
Yes.
Breasts cook a bit faster and can dry out more easily, so watch the sear closely. Cut them into even pieces and pull them off the heat as soon as they’re cooked through.
How do I prevent the sauce from getting too thick when reheating?
Add a splash of water or chicken broth before reheating and stir halfway through. This loosens the cornstarch-thickened sauce without diluting flavor too much.
Is this recipe suitable for kids?
Usually yes.
The flavors are sweet-savory and mild. If serving to young kids, skip the red pepper flakes and consider reducing the vinegar slightly for a softer taste.
Can I make it in the oven?
Absolutely. Toss the chicken with half the sauce and bake at 425°F (220°C) for 15–18 minutes, flipping once.
Simmer the remaining sauce on the stovetop until thick, then toss with the baked chicken.
What if I don’t have cornstarch?
You can use arrowroot powder in the same amount. Another option is to reduce the sauce longer over low heat, though it won’t be as glossy.
How many servings does this make?
It typically makes 4–5 meal prep bowls, depending on your portion sizes. If you’re feeding two people for several days, consider doubling the recipe.
Can I make it ahead without cooking the veggies?
Yes.
You can keep raw, washed veggies in separate containers and steam or sauté them right before eating. This keeps them extra crisp and fresh.
What’s the best way to pack it for work?
Use a microwave-safe container with two or three compartments. Place rice on the bottom, chicken on top, and veggies to the side.
Keep lime wedges and green onions in a small bag or cup to add after reheating.
Final Thoughts
Honey Garlic Chicken Meal Prep is one of those reliable recipes that tastes like takeout but fits your week just right. It’s quick to make, easy to customize, and packed with the flavors you crave at lunchtime. Prep a batch on Sunday, and you’ll thank yourself midweek when you’ve got a warm, satisfying bowl ready in minutes.
Keep the steps simple, taste as you go, and make it your own.
Printable Recipe Card
Want just the essential recipe details without scrolling through the article? Get our printable recipe card with just the ingredients and instructions.