High Protein Cheesecake Jars – Creamy, Satisfying, and Ready to Go
These cheesecake jars taste like dessert but work like a solid snack. They’re creamy, lightly sweet, and surprisingly filling thanks to a solid dose of protein. No oven, no water bath, no fuss—just blend, layer, and chill.
They’re perfect for meal prep, portion control, and late-night cravings. Make a batch once and you’ve got grab-and-go treats for days.

Ingredients
Method
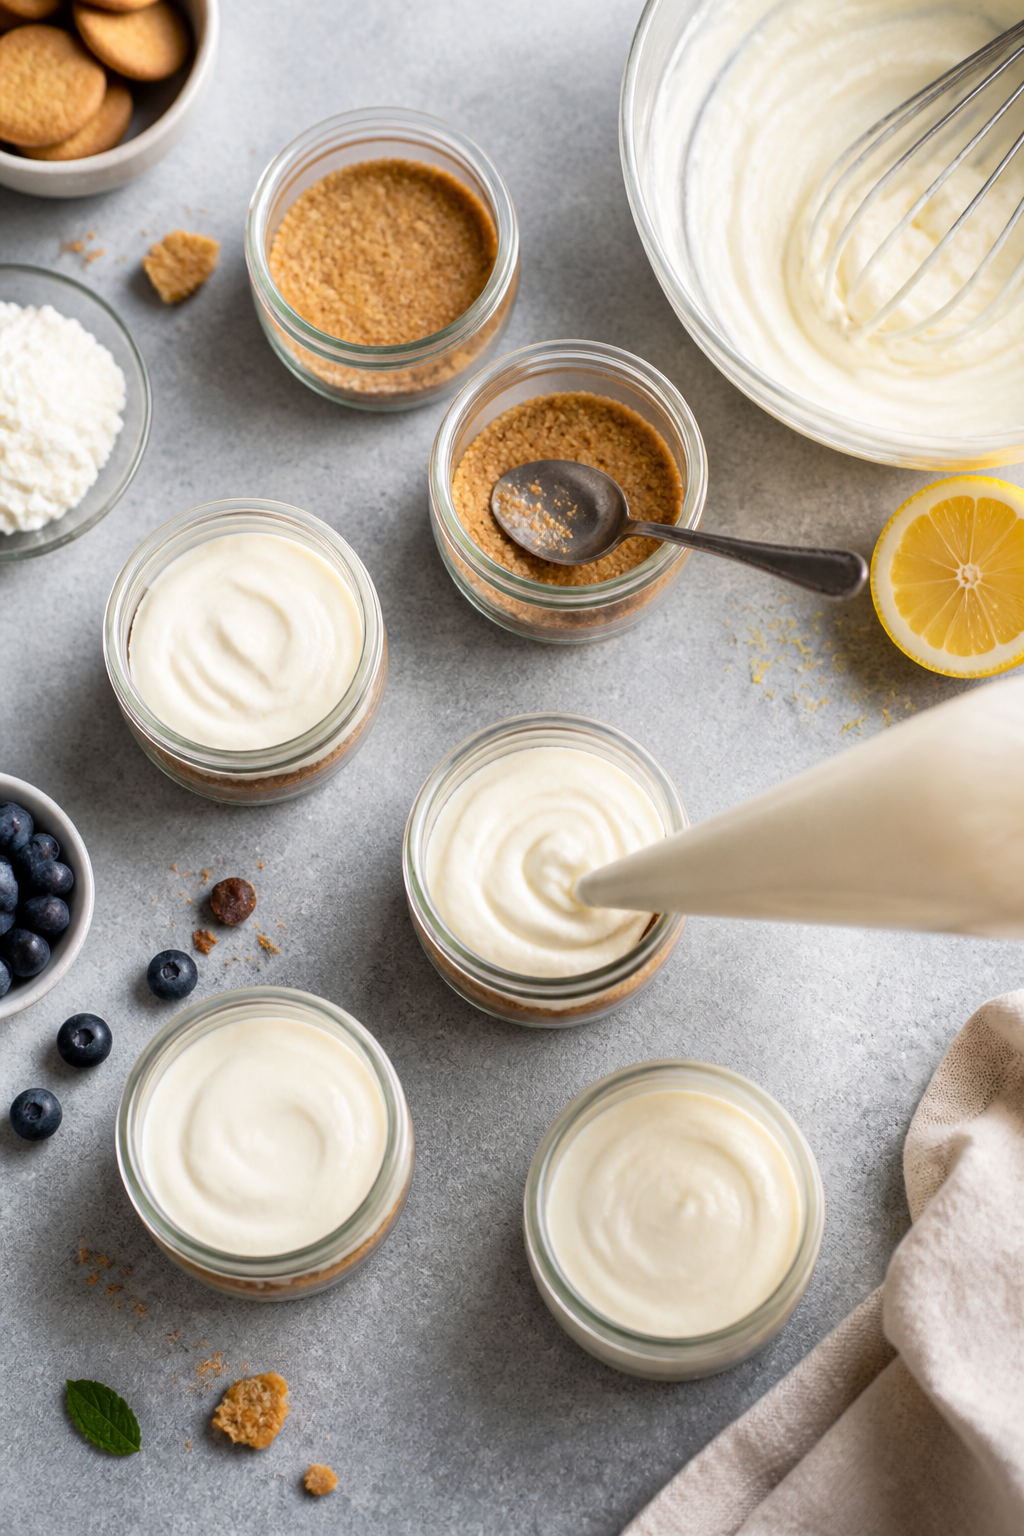
- Make the crust. Stir graham crumbs, melted butter, maple syrup, and a pinch of salt until the texture feels like damp sand. If it’s too dry, add 1–2 teaspoons more melted butter.
- Press into jars. Spoon 2–3 tablespoons of crust into each jar and press down gently with the back of a spoon. You want a light pack, not a brick.
- Whip the cream cheese. In a bowl, beat softened cream cheese until smooth and fluffy. This step prevents lumps later.
- Add yogurt and flavor. Mix in Greek yogurt, vanilla, lemon juice, and a pinch of salt. Beat until creamy.
- Blend in protein and sweetener. Add protein powder and powdered sweetener. Start slow to avoid clumps. If too thick, add milk 1 tablespoon at a time until it’s silky and spreadable.
- Taste and adjust. For more tang, add a bit more lemon. For more sweetness, add another teaspoon of sweetener. Aim for a lightly sweet, cheesecake-like balance.
- Layer the filling. Spoon or pipe the filling over the crusts, dividing evenly among the jars. Smooth the tops with a spoon.
- Chill. Cover and refrigerate for at least 2 hours, or overnight for the best set and flavor.
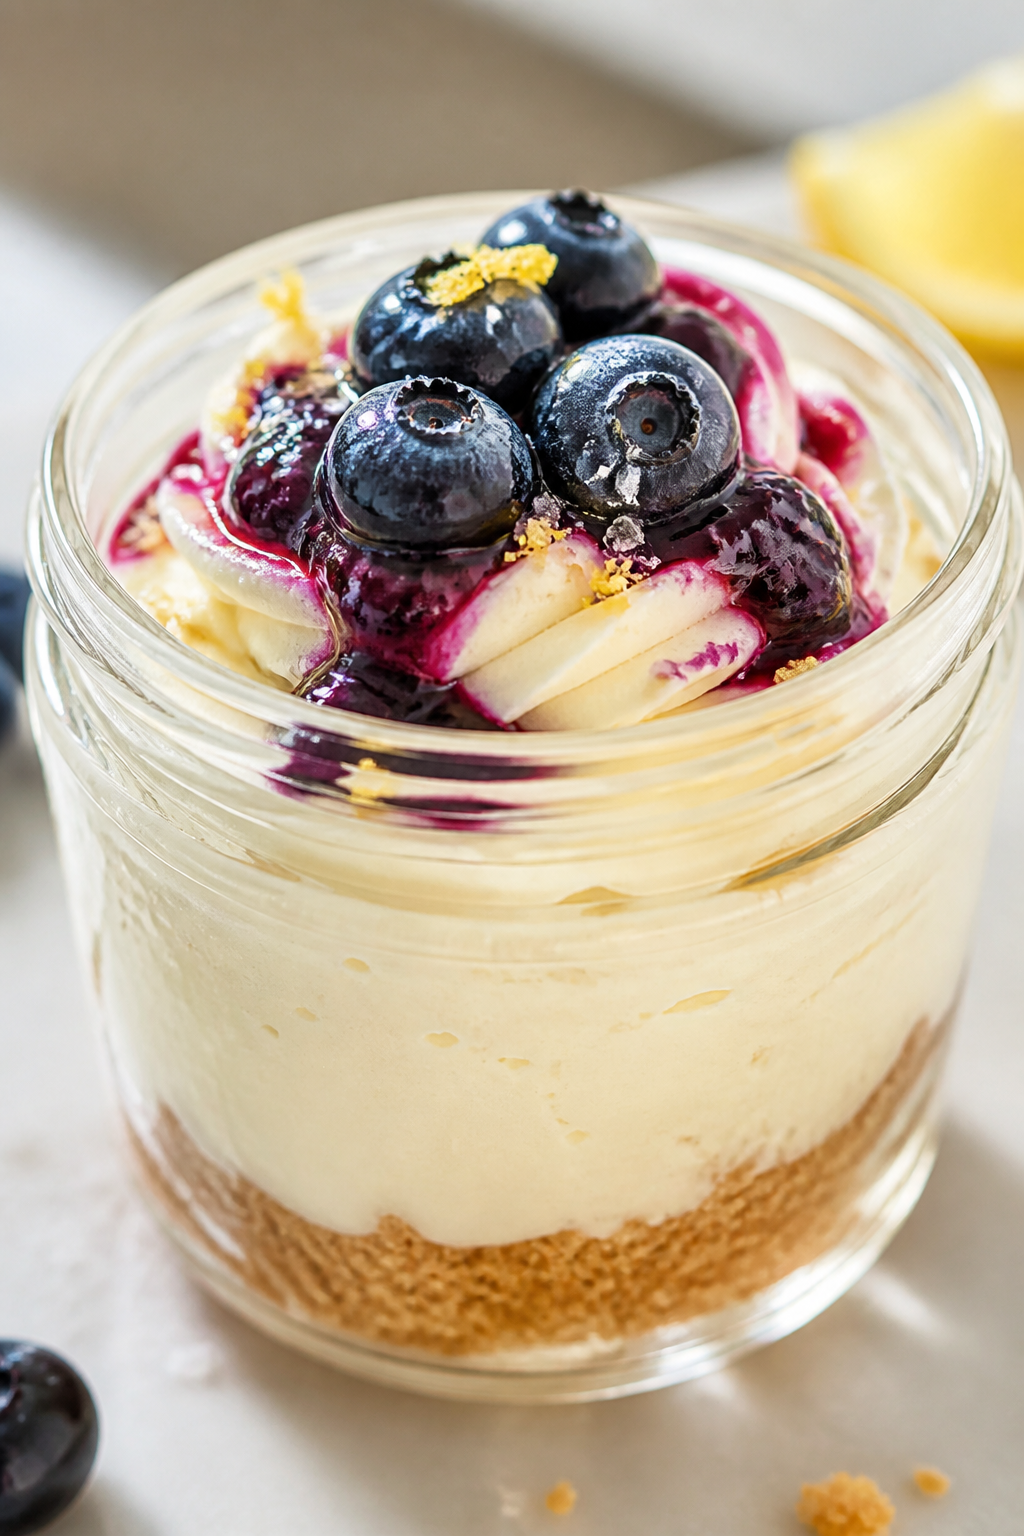
- Top and serve. Add berries, a spoonful of compote, or a sprinkle of chocolate right before eating. Enjoy cold.
What Makes This Special
These jars capture the classic cheesecake experience without the heavy lift. You get the tang of cream cheese, the smooth texture, and a crunchy base, all in a portable format.
They’re also high in protein, which means better satiety and steadier energy. Plus, the recipe is no-bake and easy to customize, so you can switch flavors to match your mood or the season.
Ingredients
- Base (Crust Layer):
- 1 cup graham cracker crumbs (or crushed digestives/ginger snaps)
- 2 tablespoons melted butter or coconut oil
- 1 tablespoon maple syrup or honey
- Pinch of salt
- Cheesecake Filling:
- 8 oz (225 g) reduced-fat cream cheese, softened
- 1 cup (225 g) nonfat Greek yogurt (or skyr for extra thickness)
- 1 scoop (25–30 g) vanilla whey or casein protein powder
- 3 tablespoons powdered sweetener (sugar, powdered monk fruit, or powdered erythritol), to taste
- 1 teaspoon vanilla extract
- 1–2 tablespoons lemon juice (to brighten)
- Pinch of salt
- 2–3 tablespoons milk of choice, as needed for texture
- Toppings (Optional but Great):
- Fresh berries or sliced fruit
- Low-sugar fruit compote or jam
- Shaved dark chocolate or mini chocolate chips
- Chopped nuts or seed mix
- Caramel or chocolate drizzle
- Equipment: 4–6 small jars (6–8 oz each), mixing bowls, electric mixer or whisk, spatula
How to Make It
- Make the crust. Stir graham crumbs, melted butter, maple syrup, and a pinch of salt until the texture feels like damp sand. If it’s too dry, add 1–2 teaspoons more melted butter.
- Press into jars. Spoon 2–3 tablespoons of crust into each jar and press down gently with the back of a spoon.
You want a light pack, not a brick.
- Whip the cream cheese. In a bowl, beat softened cream cheese until smooth and fluffy. This step prevents lumps later.
- Add yogurt and flavor. Mix in Greek yogurt, vanilla, lemon juice, and a pinch of salt. Beat until creamy.
- Blend in protein and sweetener. Add protein powder and powdered sweetener.
Start slow to avoid clumps. If too thick, add milk 1 tablespoon at a time until it’s silky and spreadable.
- Taste and adjust. For more tang, add a bit more lemon. For more sweetness, add another teaspoon of sweetener.
Aim for a lightly sweet, cheesecake-like balance.
- Layer the filling. Spoon or pipe the filling over the crusts, dividing evenly among the jars. Smooth the tops with a spoon.
- Chill. Cover and refrigerate for at least 2 hours, or overnight for the best set and flavor.
- Top and serve. Add berries, a spoonful of compote, or a sprinkle of chocolate right before eating. Enjoy cold.
Storage Instructions
- Store the jars covered in the refrigerator for up to 4 days.
- Keep toppings separate until serving to prevent sogginess.
- These don’t freeze well due to the dairy and yogurt texture changes—best kept refrigerated.
- For meal prep, label jars with the date and stack them upright to protect the crust layer.
Why This is Good for You
Each jar offers high-quality protein from Greek yogurt, cream cheese, and protein powder, which helps with satiety, muscle repair, and steady energy.
The balance of protein and moderate carbs keeps blood sugar more stable than a typical dessert. You also get calcium for bone health and, if you use Greek yogurt, a bit of probiotic benefit. The individual jars encourage portion control without feeling restrictive.
What Not to Do
- Don’t skip softening the cream cheese. Cold cream cheese leads to lumpy filling that won’t smooth out.
- Don’t add all the liquid at once. Protein powder thickens differently by brand; add milk gradually so the filling stays creamy, not runny.
- Don’t overpack the crust. A rock-hard base is tough to eat with a spoon.
Light pressure is enough.
- Don’t load wet toppings early. Fresh fruit or compote can weep moisture and make the crust soggy. Add right before serving.
- Don’t rely on only whey for thickness. Whey alone can get looser; if you prefer extra thick, use a blend or casein, or reduce the milk.
Variations You Can Try
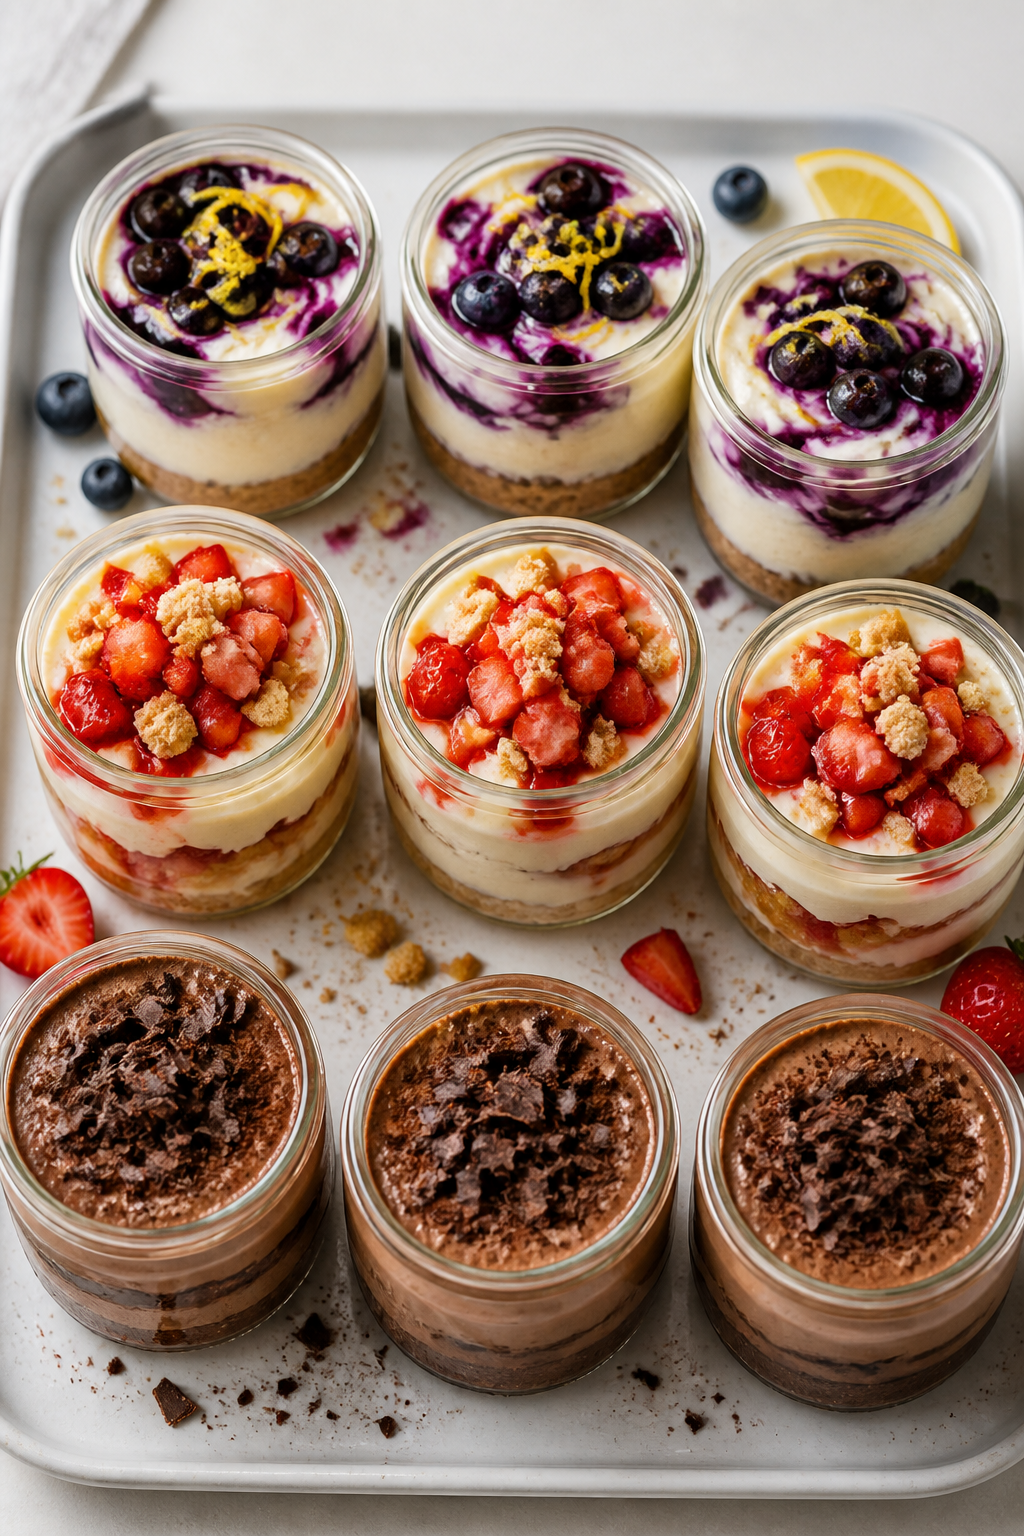
- Chocolate Cheesecake: Swap vanilla protein for chocolate, add 1–2 tablespoons cocoa powder, and top with shaved dark chocolate.
- Lemon Blueberry: Add extra lemon zest to the filling and swirl in a spoonful of blueberry jam before chilling.
- Strawberry Shortcake: Use vanilla filling, layer with diced strawberries, and sprinkle crushed shortbread or vanilla wafers on top.
- Mocha: Add 1 teaspoon instant espresso and use chocolate protein. Finish with a dusting of cocoa.
- Salted Caramel: Keep the vanilla base, then drizzle a light caramel sauce and add a pinch of flaky sea salt before serving.
- Gluten-Free: Use gluten-free cookies or oats pulsed with a little butter and sweetener for the crust.
- Higher Protein Boost: Stir 2–3 tablespoons powdered milk into the filling or use skyr for denser protein.
- Lower Sugar: Use a zero-calorie powdered sweetener and top with fresh berries instead of jam.
FAQ
How much protein is in each jar?
It varies by your protein powder and jar size, but a typical 6–8 oz jar made with Greek yogurt and one scoop of protein powder usually lands around 15–22 grams of protein.
Using skyr or adding powdered milk can push it higher.
Can I make this without protein powder?
Yes. Skip the protein powder and add another 1/2 cup Greek yogurt plus 1–2 tablespoons powdered milk or instant pudding mix for body. You’ll lose some protein but keep the texture.
What’s the best protein powder for this?
Vanilla whey-casein blends or pure casein work best for a thick, spoonable texture.
Whey alone can be thinner, so reduce added milk if using only whey.
Can I make it dairy-free?
Use dairy-free cream cheese, thick coconut or almond yogurt, and a plant-based protein powder. You may need a splash less liquid and a bit more sweetener to balance the flavor.
Why is my filling grainy?
That can happen if the cream cheese wasn’t fully softened or if the sweetener didn’t dissolve. Beat the cream cheese until fluffy first, use powdered sweetener, and add liquids gradually while mixing.
Can I bake the crust?
You don’t need to, but you can bake the crumb mixture at 350°F (175°C) for 6–8 minutes to enhance the toasty flavor.
Let it cool completely before assembling.
What jar size should I use?
Jars between 6 and 8 ounces are ideal. They fit a satisfying portion without getting overly heavy, and they stack neatly in the fridge.
How long do they need to chill?
A minimum of 2 hours sets the filling. Overnight is even better for flavor and texture, especially if you’re prepping for the week.
Can I cut the fat even more?
You can use fat-free cream cheese, but the texture becomes less rich and slightly chalky.
A good compromise is reduced-fat cream cheese and nonfat Greek yogurt for creaminess without the heavy calories.
Wrapping Up
High Protein Cheesecake Jars bring dessert energy to your snack game without the sugar crash. They’re quick to make, easy to customize, and built for busy days. Whip up a batch on Sunday, stash them in the fridge, and you’re set with creamy, satisfying jars all week.
Simple, portable, and genuinely tasty—this is one prep you’ll actually look forward to eating.
Printable Recipe Card
Want just the essential recipe details without scrolling through the article? Get our printable recipe card with just the ingredients and instructions.